Update:
So it only took HR 7 days to call the person they picked, but the end result was it wasn't me. It was a girl who was in my cohort in college who also long-term subbed at that school. While I'm happy for my friend and glad it went to someone who I feel is deserving of the job, I'm incredibly sad that I was not chosen. School starts in two weeks and I'm running out of time (and hope) and am having to face the reality that I might not have my own classroom this coming school year. I'm not entirely sure what I'm going to do should I not find a full time teaching job this fall, but I guess need to start weighing the various options now.
________________________________________________
Hi Friends! Just thought I would pop in and let you all know that I have a job interview this coming Wednesday (Aug. 3rd). It is for a 2nd grade position at the school where I long-term subbed this spring. While it may not be my ideal school, it is a for a grade I would love to teach and beggars can't be choosers. While I'm super excited about the prospect of teaching 2nd grade and just having a job in general, I'm also super nervous. I know I'm not the best at interviewing and I'm really hoping that I don't mess up my one chance at a full time job (I don't really expect that I'll get any more calls for full-time positions).
If you are the praying type, please keep me in your prayers on Wednesday. And if you have any advice or thoughts, I'd love to hear that too.
I will be headed out of town immediately after the interview but I'll do my best to post an update if/when I hear something.
Hope everyone is enjoying their summer (and the last little bit of it for some of you). Here's so hopefully having my own classroom for the 2011-1012 school year!

Saturday, July 30, 2011


Monday, July 25, 2011
6 Simple Ways to Practice Sight Words
This summer (as I have the past 4 summers) I'm nannying. This year I have two kids, one who is going into 2nd grade and the other who is going into kindergarden. The 2nd grader has summer school every morning and the soon-to-be kindergardener cannot wait to start school. So we've been getting a head start and I've started teaching her some sight words (the teacher in me just can't help it).
Here are some of our favorite simple ways to practice (note: it helps if you already have all the words written on index cards). We say-spell-say all of the words everyday.
1. Mail Call
Stuff one sight word card into an empty envelope. Then announce a "mail call" and allow the lucky recipient to open each envelope and read the word inside.

2. Shaving Cream
When I do this at school, I have the kids do it directly on their desks or on a large piece of construction paper. We've been doing it on a cookie sheet at home. You could also use a plastic tray.
Just squirt a little shaving cream on the desk/tray and have the kiddo smear it around and then start writing. For a little extra touch you can add food coloring (2-3 drops for a cereal size bowl full, trust me, or you'll end up with dyed hands) or a little glitter.

3. Scrambled Eggs
If you can find some plastic eggs somewhere is your holiday decorations stash pull them out and fill them with letters that spell sight words (if you don't have enough/small enough letters, just type the words and then cut them apart). I put mine in empty egg cartons and have the kids crack them over an old frying pan.
This is a really great activity to keep on hand for those times when you have an extra few minutes or to use as an early finishers activity. The letters I use in my eggs I use specifically for the eggs so I pre-make my cartons and have them ready and waiting.

4. Pick-up Sticks
Write your sight words on small popsicle sticks and place them, word side down, in a large plastic cup. Then give each player a smaller cup. Players take turns drawing a stick and reading the word. If the player gets the word correct, she adds it to her cup. If she doesn't get it correct, it goes back in the cup. (Once the players are very familiar with the words in the cup, I play that the player has to return all sticks if a word is missed). Person with the most sticks at the end wins.

5. Ladder Climb
Grab some paint chips and tap them together (leave a little room so you can fold it up). Get your sight words and a marker (penny, toy car, action figure, whatever) and try to climb your ladder. Choose a few more sight words than spaces (so for a ladder with 12 spaces, I choose about 15-18 words). You move up a space for every word you get correct and back one for every word missed. (Once the player is very familiar with the words in the stack, a missed word moves you back to the bottom or I choose the same number of words as spaces so a missed word means the player won't make it to the top. It's surprisingly motivating). The goal is to make it to the top of the ladder before you run out of words.
I make lots of ladders with different amounts of spaces and in different colors so that students can self select which ladder they want to climb. You can also use the wider cards (like the Behr ones from Home Depot) and race to the top with multiple players.

6. I Spy a Sight Word
Write a sight words on sticky-notes and stick them around the room/house. Then give your little detective a note pad and pencil and tell them to spy for sight words and write down what they find. Detective type accessories like a magnifying glass are highly suggested. You could also write down clues on the pad and then have the detective fill in the correct word (such as: this word starts with the letter /t/ and ends in /y/; this words is a color; this word rhymes with _____).
Whats a simple way you like to practice sight words?
Here are some of our favorite simple ways to practice (note: it helps if you already have all the words written on index cards). We say-spell-say all of the words everyday.
1. Mail Call
Stuff one sight word card into an empty envelope. Then announce a "mail call" and allow the lucky recipient to open each envelope and read the word inside.

2. Shaving Cream
When I do this at school, I have the kids do it directly on their desks or on a large piece of construction paper. We've been doing it on a cookie sheet at home. You could also use a plastic tray.
Just squirt a little shaving cream on the desk/tray and have the kiddo smear it around and then start writing. For a little extra touch you can add food coloring (2-3 drops for a cereal size bowl full, trust me, or you'll end up with dyed hands) or a little glitter.

3. Scrambled Eggs
If you can find some plastic eggs somewhere is your holiday decorations stash pull them out and fill them with letters that spell sight words (if you don't have enough/small enough letters, just type the words and then cut them apart). I put mine in empty egg cartons and have the kids crack them over an old frying pan.
This is a really great activity to keep on hand for those times when you have an extra few minutes or to use as an early finishers activity. The letters I use in my eggs I use specifically for the eggs so I pre-make my cartons and have them ready and waiting.

4. Pick-up Sticks
Write your sight words on small popsicle sticks and place them, word side down, in a large plastic cup. Then give each player a smaller cup. Players take turns drawing a stick and reading the word. If the player gets the word correct, she adds it to her cup. If she doesn't get it correct, it goes back in the cup. (Once the players are very familiar with the words in the cup, I play that the player has to return all sticks if a word is missed). Person with the most sticks at the end wins.

5. Ladder Climb
Grab some paint chips and tap them together (leave a little room so you can fold it up). Get your sight words and a marker (penny, toy car, action figure, whatever) and try to climb your ladder. Choose a few more sight words than spaces (so for a ladder with 12 spaces, I choose about 15-18 words). You move up a space for every word you get correct and back one for every word missed. (Once the player is very familiar with the words in the stack, a missed word moves you back to the bottom or I choose the same number of words as spaces so a missed word means the player won't make it to the top. It's surprisingly motivating). The goal is to make it to the top of the ladder before you run out of words.
I make lots of ladders with different amounts of spaces and in different colors so that students can self select which ladder they want to climb. You can also use the wider cards (like the Behr ones from Home Depot) and race to the top with multiple players.

6. I Spy a Sight Word
Write a sight words on sticky-notes and stick them around the room/house. Then give your little detective a note pad and pencil and tell them to spy for sight words and write down what they find. Detective type accessories like a magnifying glass are highly suggested. You could also write down clues on the pad and then have the detective fill in the correct word (such as: this word starts with the letter /t/ and ends in /y/; this words is a color; this word rhymes with _____).
Whats a simple way you like to practice sight words?
Thursday, July 21, 2011
Alphabet Soup No More
In an effort to get better organized, I finally ended my run of keeping all my little plastic letters in a large plastic baggie. Nothing like desperately needing the letter /n/ and having to dig through the whole alphabet to try and find it.
I've been wanting to get one of those plastic bead organizers for a while, but the only thing has been that I can't find one large enough to hold my whole alphabet and I'd prefer to have it all together and not in a few different bins.
I never thought my search would end during a trip to Home Depot with the boyfriend. While he was staring at tow cables I got bored and began to wander and stumbled upon this!
:insert angels singing:

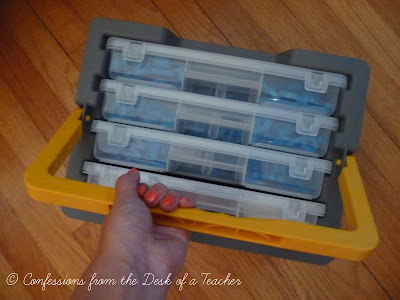


Sure, the whole alphabet isn't in one container, but it is contained in one easy to transport container which is perfect for carrying around the room. It's super light and would be easy for kids to carry as well. It can even be wall mounted should you so desire.
I was hoping to fit both my uppercase and lowercase letters, but it wasn't quite big enough for that so I settled for just lowercase letters. I really only use the lowercase letters, so for now all my uppercase letters will stay in a bag.

I labeled the inside of each section so that kiddos could easily put back letters in the correct spot and I'll eventually label the outside of each container with the letters it contains but alas, I ran out of a tape in my labeler.

I didn't quite need all four containers, so I added some pencils/pens, highlighters and post-it notes to the last box (not pictured, so you can stop squinting at the above picture).
I really hope it works out and I'm really, really hoping I get to give it a test run this fall (still no word yet on a job). For those interested in buying it's by a brand called WorkForce (real original right?) and I found it near all the screws and nails with like storage products.
Anyone else organizing this summer?
*Please excuse the cat in the pictures. I was doing this at home and she was trying to be my assistant.
I've been wanting to get one of those plastic bead organizers for a while, but the only thing has been that I can't find one large enough to hold my whole alphabet and I'd prefer to have it all together and not in a few different bins.
I never thought my search would end during a trip to Home Depot with the boyfriend. While he was staring at tow cables I got bored and began to wander and stumbled upon this!
:insert angels singing:


Sure, the whole alphabet isn't in one container, but it is contained in one easy to transport container which is perfect for carrying around the room. It's super light and would be easy for kids to carry as well. It can even be wall mounted should you so desire.
I was hoping to fit both my uppercase and lowercase letters, but it wasn't quite big enough for that so I settled for just lowercase letters. I really only use the lowercase letters, so for now all my uppercase letters will stay in a bag.

I labeled the inside of each section so that kiddos could easily put back letters in the correct spot and I'll eventually label the outside of each container with the letters it contains but alas, I ran out of a tape in my labeler.

I didn't quite need all four containers, so I added some pencils/pens, highlighters and post-it notes to the last box (not pictured, so you can stop squinting at the above picture).
I really hope it works out and I'm really, really hoping I get to give it a test run this fall (still no word yet on a job). For those interested in buying it's by a brand called WorkForce (real original right?) and I found it near all the screws and nails with like storage products.
Anyone else organizing this summer?
*Please excuse the cat in the pictures. I was doing this at home and she was trying to be my assistant.
Thursday, July 7, 2011
Woodland Critters Multiple Choice Pinch Cards
This spring my school went through a major paper "crisis." The higher ups decided we were consuming way to much paper and decided to start rationing it. Of course what they failed to see was that it was partly because of demands they were putting on their teachers, but we won't go there.
Left virtually paperless, we were left to figure out ways to collect data using little to no paper. One of my favorites is pinch cards. They are super easy to create and use. They require almost no prep should you choose and kids love using them.

I created a set of multiple choice question pinch cards with a woodland critters theme that I now have for sale in my Teachers Pay Teachers store. Please take a look and consider purchasing them. If you would like another theme, just let me know and I'll see what I can do!
Left virtually paperless, we were left to figure out ways to collect data using little to no paper. One of my favorites is pinch cards. They are super easy to create and use. They require almost no prep should you choose and kids love using them.
I created a set of multiple choice question pinch cards with a woodland critters theme that I now have for sale in my Teachers Pay Teachers store. Please take a look and consider purchasing them. If you would like another theme, just let me know and I'll see what I can do!
Friday, June 24, 2011
Oh the mess I have made...
... in my dining room!
Since I don't know where I'll be teaching next year when school was out, so was all my stuff. Because the room I was in wasn't officially mine, I only brought in bits and pieces of my stuff. However, I also inherited a lot of things too from one teacher who was retiring and some other teachers who were making major grade level changes.


When it came time to pack up I realized my stuff had somehow multiplied and I had a lot to bring home! It all landed in my dining room and I'm procrastinating now because my bins in the basement with all my teaching stuff are/were already a mess from me digging through them all year to find the random items I wanted to take to school. I really don't feel like organizing and putting this all away, only to dig it back out again. But alas... I probably should.
Since I don't know where I'll be teaching next year when school was out, so was all my stuff. Because the room I was in wasn't officially mine, I only brought in bits and pieces of my stuff. However, I also inherited a lot of things too from one teacher who was retiring and some other teachers who were making major grade level changes.


When it came time to pack up I realized my stuff had somehow multiplied and I had a lot to bring home! It all landed in my dining room and I'm procrastinating now because my bins in the basement with all my teaching stuff are/were already a mess from me digging through them all year to find the random items I wanted to take to school. I really don't feel like organizing and putting this all away, only to dig it back out again. But alas... I probably should.
Thursday, June 23, 2011
Go on a Fact Treasure Hunt!
I don't know about you, but my kiddos love, love, love doing anything with non-fiction text! I found these adorable pirate graphic from Scrappin' Doodles and thought they would be perfect for creating some pirate themed non-fiction text graphic organizers. I'm working on putting a whole set together, but here is a freebie for you while you wait!

Click on the preview above to download from my new Teachers Pay Teachers store. I've decided to start uploading anything I make to that site as it will allow for more teachers to be able to find and access my items. Please leave feedback and subscribe, I will return the favor if you are a seller as well.
Click on the preview above to download from my new Teachers Pay Teachers store. I've decided to start uploading anything I make to that site as it will allow for more teachers to be able to find and access my items. Please leave feedback and subscribe, I will return the favor if you are a seller as well.
Thursday, June 9, 2011
Sorting Pockets
For all you lucky ducks who are out of school already (6 more days!!!) and are planning for next year, here is something super simple to make.
I made these for my class to use for sorting activities. They are generic and can be used for any type of sort you want to create.


Each folder contains a envelope on the back to store the cards for the sort and 3 library pockets inside. The pockets have velcro on them so that I can change the sort categories at any time. We were identifying strategies we could use to help us solve addition facts quickly on the day I took these pictures. To create the cards for the sort all I do is create a table in Word or Pages (depending on whether I'm at school or home) and plug in what I want them to sort. These are an excellent center activity or a "I'm done, now what?" activity. Despite their simplicity the kids love them!
Tuesday, May 24, 2011
Free Dictionary Skills Activity!
I'm on the prowl for fun activities to use at the end of the year as we slowly finished up our curriculum. This activity from the new blog The Lesson Plan Diva is perfect for that kind of thing. It's a skill that is necessary but typically addressed in regular curriculum. Visit her blog to get your own copy!

Monday, May 23, 2011
Clear the Board
As we start to wind down the year, we've been pulling out more and more math games to play with the kids. Honestly at this point, no one, including the kids feel like doing any real work, so games it is!
My absolute favorite game is Clear the Board which I've taught to most of first grade and about a dozen second graders so far. It's great for that fact practice and an added bonus is that there is a built in number line for any needed help.

I did notice that it tends to take a little encouragement to get the kids to use more than one operation to remove chips from their board. However, every time I taught a group of kids how to play, there was always someone who was upset because they were certain their partner was cheating. Why? Their partner had barely any chips on his or her side and they had a ton left. Nine time out of 10 this is because one player was using both addition and subtraction to remove chips, while the other was using only addition. I usually used this to make a point that this game required the use of both if you wish to win.
A few of my second graders are also starting to understand multiplication. I told them they are allowed to use multiplication to remove chips, but only if they are willing to help their partner use multiplication. All were willing and the result was new students beginning to gain an understanding of a new concept. Yahoo!

Click here to download the game board and click here to download the directions. You'll also need two 6-sided dice per partnership (I also heart double dice and so do my kiddos) and manipulatives of some sort. Standard size chips are actually too big and I keep meaning to bring in beans to use instead.
Happy gaming!
My absolute favorite game is Clear the Board which I've taught to most of first grade and about a dozen second graders so far. It's great for that fact practice and an added bonus is that there is a built in number line for any needed help.

I did notice that it tends to take a little encouragement to get the kids to use more than one operation to remove chips from their board. However, every time I taught a group of kids how to play, there was always someone who was upset because they were certain their partner was cheating. Why? Their partner had barely any chips on his or her side and they had a ton left. Nine time out of 10 this is because one player was using both addition and subtraction to remove chips, while the other was using only addition. I usually used this to make a point that this game required the use of both if you wish to win.
A few of my second graders are also starting to understand multiplication. I told them they are allowed to use multiplication to remove chips, but only if they are willing to help their partner use multiplication. All were willing and the result was new students beginning to gain an understanding of a new concept. Yahoo!

Click here to download the game board and click here to download the directions. You'll also need two 6-sided dice per partnership (I also heart double dice and so do my kiddos) and manipulatives of some sort. Standard size chips are actually too big and I keep meaning to bring in beans to use instead.
Happy gaming!
Tuesday, May 17, 2011
Practicing Sentence Structure
A few of my special friends have some really issues with sentence structure. They can verbalize thoughts, but getting it on paper is next to impossible.
We read a story about a dog that was pretending he was under sea while he was taking a bath the other day. However this is what I got for sentences on our graphic organizer, even though they had just verbalized sentences to me.
"dog sea Bath"
"bathtub In sea dog the Pretending"
"dog a bath the sea"
Yeah.... we have some work to do.
One activity we've been doing is "jigsaw sentences." I got this idea from Peggy Kaye's Games for Reading book (must buy book, by the way!).
She gives examples of sentences in her book, and I just copied those because I didn't feel like coming up with my own. You can of course simply create your own if you desire.

I placed each sentence in an envelope and placed a dot sticker in the corner to indicate difficulty. Blue sentences are the easiest, then green, yellow, and red. The basket is just one of those narrow pencil baskets.

When they open an envelope they take out each piece and lay it out. I have them read the "sentence" then make their adjustments. Some are better at this than others. I've been trying to point out that sentences always start with a capital letter and end with punctuation, but not all of them remember this. Some will only move one word/phrase before reading again, while others will rearrange a few.

Eventually we land on a sentence that makes sense. If they are working with me then we just read the sentence till it makes sense, however if they are working independently, I have them record their completed sentences so I can see what they are doing.
One big benefit I have noticed is because we have to read the sentence over and over again, they've added some words to their sight word vocabulary. Yay for double-duty activities!
I also have strips with the beginning, middle, and end of sentences on them. Some put together might be silly, but will make sense, others will not. I can't seem to find the time time to cut them out of the lamination, however. Haha, one day.
Has sentence structure ever been difficult for your students(s)/child? What did you do?
We read a story about a dog that was pretending he was under sea while he was taking a bath the other day. However this is what I got for sentences on our graphic organizer, even though they had just verbalized sentences to me.
"dog sea Bath"
"bathtub In sea dog the Pretending"
"dog a bath the sea"
Yeah.... we have some work to do.
One activity we've been doing is "jigsaw sentences." I got this idea from Peggy Kaye's Games for Reading book (must buy book, by the way!).
She gives examples of sentences in her book, and I just copied those because I didn't feel like coming up with my own. You can of course simply create your own if you desire.

I placed each sentence in an envelope and placed a dot sticker in the corner to indicate difficulty. Blue sentences are the easiest, then green, yellow, and red. The basket is just one of those narrow pencil baskets.

When they open an envelope they take out each piece and lay it out. I have them read the "sentence" then make their adjustments. Some are better at this than others. I've been trying to point out that sentences always start with a capital letter and end with punctuation, but not all of them remember this. Some will only move one word/phrase before reading again, while others will rearrange a few.

Eventually we land on a sentence that makes sense. If they are working with me then we just read the sentence till it makes sense, however if they are working independently, I have them record their completed sentences so I can see what they are doing.
One big benefit I have noticed is because we have to read the sentence over and over again, they've added some words to their sight word vocabulary. Yay for double-duty activities!
I also have strips with the beginning, middle, and end of sentences on them. Some put together might be silly, but will make sense, others will not. I can't seem to find the time time to cut them out of the lamination, however. Haha, one day.
Has sentence structure ever been difficult for your students(s)/child? What did you do?
Saturday, May 7, 2011
The Great Dry-Erase Experiment
Okay so it really wasn't all that "great," but it was interesting to discover the results.
In this post I mentioned I was trying out this new and revolutionary product called- dry-erase crayons.
*insert "oooohhh's" and "aaahhh's"*
I was hoping it would change my experience with dry-erase boards forever, and now the results are in.

I tested the crayons versus regular old Expo dry-erase markers and regular Crayola crayons since I had heard rumors that they worked as well. The white board was just any old classroom white board. I didn't clean it since I figured a dirty board is more realistic and would give more realistic results.

So here it is, left to right a blue Crayola crayon, a blue Crayola dry-erase crayon, and a blue Expo dry-erase marker. You can see that the marker is the darkest, although I thought the dry-erase crayon was plenty dark to be practical. The regular crayon is the lightest in color, but is still visible enough to be acceptable.

Here is what they look like erased. I didn't apply a lot of pressure and it might be hard to see but the marker cleared the cleanest. The crayons require a little more effort to erase.
My conclusion is sort of mixed. I like the crayons, however I found for the most part that primary students tend to press down way to hard when writing which makes the crayon hard to erase sometimes. When I used them, with a lighter and more appropriate pressure, erasing was no problem. You could however, turn it into a lesson on proper pressure when writing.
The regular crayons got really mixed results. The best results were with dark crayon colors, and all the crayons tested were the Crayola brand because well, they aren't lying when they say on the box they are preferred by teachers. I'd be interested to see the results with other brands. They do require that you press down harder when writing, but honestly my kiddos do that already so it wasn't an issue. However the color is still lighter and if you use it for "every pupil response" it might be hard to read those in the back.
One thing that I saw in the reviews were issues with using markers on a board after the dry-erase crayons had been used. Not once did I have an issue with this, so I'm not really sure whether this is actually an issue or not.
So there you have it. Yes, they work, but no, they are not perfect. I'm still debating what I will choose to use in the fall, but I have a feeling it will be a mix of both.
So after reading this, what do you think? Will you stick with your markers or give the crayons a shot?
In this post I mentioned I was trying out this new and revolutionary product called- dry-erase crayons.
*insert "oooohhh's" and "aaahhh's"*
I was hoping it would change my experience with dry-erase boards forever, and now the results are in.

I tested the crayons versus regular old Expo dry-erase markers and regular Crayola crayons since I had heard rumors that they worked as well. The white board was just any old classroom white board. I didn't clean it since I figured a dirty board is more realistic and would give more realistic results.

So here it is, left to right a blue Crayola crayon, a blue Crayola dry-erase crayon, and a blue Expo dry-erase marker. You can see that the marker is the darkest, although I thought the dry-erase crayon was plenty dark to be practical. The regular crayon is the lightest in color, but is still visible enough to be acceptable.

Here is what they look like erased. I didn't apply a lot of pressure and it might be hard to see but the marker cleared the cleanest. The crayons require a little more effort to erase.
My conclusion is sort of mixed. I like the crayons, however I found for the most part that primary students tend to press down way to hard when writing which makes the crayon hard to erase sometimes. When I used them, with a lighter and more appropriate pressure, erasing was no problem. You could however, turn it into a lesson on proper pressure when writing.
The regular crayons got really mixed results. The best results were with dark crayon colors, and all the crayons tested were the Crayola brand because well, they aren't lying when they say on the box they are preferred by teachers. I'd be interested to see the results with other brands. They do require that you press down harder when writing, but honestly my kiddos do that already so it wasn't an issue. However the color is still lighter and if you use it for "every pupil response" it might be hard to read those in the back.
One thing that I saw in the reviews were issues with using markers on a board after the dry-erase crayons had been used. Not once did I have an issue with this, so I'm not really sure whether this is actually an issue or not.
So there you have it. Yes, they work, but no, they are not perfect. I'm still debating what I will choose to use in the fall, but I have a feeling it will be a mix of both.
So after reading this, what do you think? Will you stick with your markers or give the crayons a shot?
Monday, May 2, 2011
Teaching money makes my head spin
Guess what?! Despite the fact that we have 34 days of school left (yes, I just counted) we will finish our math curriculum on Wednesday.
And do you know what that means?
IT'S TIME TO PARTY!
Okay well sort of. We will party because we will have completed all the curriculum for the year, but we will also party because it's means we can now move on to practice what my firstie friends really need to practice and have a little fun too. (Can we say buh-bye workbooks?!)
Up first-ish is money. I swear, I love, love teaching my little friends, but when it comes to teaching money (and time), I just want to run screaming to 5th grade (of course there I'd have to teach positive and negative integers, so maybe I take that back).
I've learned my kiddos l-o-v-e using spinners (that is once I taught them how to hold two corners with one hand, while they spin with the other). I bought some clear plastic spinners from Nasco and we've been using them with Jessica Meacham's spin and write games, so I decided to carry over the love to math.
I created a basic coin spinner, which they will use with a variety of game sheets depending on their level of money understanding. Eventually (read: this summer) I'll load all of the spinner varieties and game sheets into one document it and upload it, but for now, here is one of the basic spinner templates and game sheets.
(Click picture to download)


And do you know what that means?
IT'S TIME TO PARTY!
Okay well sort of. We will party because we will have completed all the curriculum for the year, but we will also party because it's means we can now move on to practice what my firstie friends really need to practice and have a little fun too. (Can we say buh-bye workbooks?!)
Up first-ish is money. I swear, I love, love teaching my little friends, but when it comes to teaching money (and time), I just want to run screaming to 5th grade (of course there I'd have to teach positive and negative integers, so maybe I take that back).
I've learned my kiddos l-o-v-e using spinners (that is once I taught them how to hold two corners with one hand, while they spin with the other). I bought some clear plastic spinners from Nasco and we've been using them with Jessica Meacham's spin and write games, so I decided to carry over the love to math.
I created a basic coin spinner, which they will use with a variety of game sheets depending on their level of money understanding. Eventually (read: this summer) I'll load all of the spinner varieties and game sheets into one document it and upload it, but for now, here is one of the basic spinner templates and game sheets.
(Click picture to download)
I created this game because some of my special friends are still having difficulty recalling the names and values of the the four basic coins. Hopefully the constant repetition of this game will help drill those names and values in their cute little brains.
To play, the students take turns spinning the spinner and matching the coin spun to a coin value on their game sheet. First person to fill an entire column wins. Or to make it last longer you could say the whole board, or give a specific amount of money to be reached. It could even be played solo. Simple as that!
Now if only teaching money was that simple...
Have you finished your curriculum yet? What have you been doing/ what are you going to do when you do?
Monday, April 25, 2011
Dry-erase Board Erasers - Cheap!
The math curriculum (Everyday Math) used in the county I teach in is heavy on "slate work." A.k.a. using dry-erase boards. I've seen a lot of the teachers buy those cute little mini erasers from places like Lakeshore, however that can add up quick, and end up relatively "expensive" when there is a cheaper alternative - felt.

(Off topic- do you love my bright, lime green counter tops or what?!)
I had my felt left over from a project I did back when I was first in teacher school, so my erasers where free, however, felt is fairly cheap, and if you buy it off the bolt with a coupon, it's even cheaper. Like a penny an eraser (according to my highly mathematical calculations). They work just as well as store bought erasers and it's no big deal when someone loses one.
My next dry-erase board experiment is dry erase crayons. I saw them on Amazon.com, and my box is due to arrive Tuesday and I'm excited to test them out. I've also heard regular crayons work too. I'll be doing some experimenting, because I'll be honest, I hate dry-erase markers. They are expensive, smelly, the kids are always losing the caps and then they dry out, or are pressing to hard and pushing the points in. I have my fingers crossed that the crayons work.
Have you ever tried dry erase crayons? Please, do tell!

(Off topic- do you love my bright, lime green counter tops or what?!)
I had my felt left over from a project I did back when I was first in teacher school, so my erasers where free, however, felt is fairly cheap, and if you buy it off the bolt with a coupon, it's even cheaper. Like a penny an eraser (according to my highly mathematical calculations). They work just as well as store bought erasers and it's no big deal when someone loses one.
My next dry-erase board experiment is dry erase crayons. I saw them on Amazon.com, and my box is due to arrive Tuesday and I'm excited to test them out. I've also heard regular crayons work too. I'll be doing some experimenting, because I'll be honest, I hate dry-erase markers. They are expensive, smelly, the kids are always losing the caps and then they dry out, or are pressing to hard and pushing the points in. I have my fingers crossed that the crayons work.
Have you ever tried dry erase crayons? Please, do tell!
Saturday, April 23, 2011
Colorful Number Grids
In the county I teach in we use Everyday Math, which I've found is a bit heavy on the use of number grids. This was sort of new to me since I can't really recall ever using one as an elementary student (I was a Saxon Math kid). Additionally many of my "special friends" are allowed the use of a number grid as one of their accommodations.

One issue many of them were having however was sweeping forwards or back along the grid when skip counting, adding or subtracting. Unfortunately many of them don't quite understand number patterns well enough yet to realize when they've skipped a decade, etc.

I decided to give them a colored visual to help them connect each end and hopefully reduce simple errors. So far it seems to be working. I never explained how to "match" the colors when sweeping, but most picked up on it, and have been making fewer errors.
It also helps them to correct a sweeping error, such as if they are sweeping back from 41, which is yellow, but land on 30, which is pink, they realize this can't be right. I'm hoping this will help some of them notice that patterns more as well.
I've also made a few which highlight skip counting patterns, as well as having the 0 and 1's columns colored. My next project is to do some 200's charts for my second grade friends who do fine going forward, but tend to get loss when needing to go backwards for subtraction problems.
If you are in need of a hundred's chart, mine came out of a Scholastic book, however most math curriculums have one ready to copy and you can find plenty by just googling.
Have you ever modified something for your students (special education or not) that has helped them better understand a concept or complete a task?
Friday, April 22, 2011
Home Literacy Kits
The school I'm currently at serves a military base. Many of our students are very transient, coming from other states and even other countries. Some haven't ever had a full grade level in one school, and others, although U.S. citizens, are better versed in a language other than English.
In the 1st grade class I am in, this has proved to be a big problem. I have students with special needs and/or learning disabilities, but I also have students who never went to Pre-K or Kindergarden or who attended a Kindergarden that was more like a Pre-K in the state of Maryland. One of my students came from a state where 1st grade was more like our Pre-K, and thus when she came in November, she didn't even know her whole alphabet. Yikes!
One of my (hopefully) solutions was to create home literacy kits. Many studies show that students who receive support/practice at home excel more than those who do not. My hope is that if I provide the resources, then maybe some of my student's parents/guardians will start practicing with them at home.
Here is what I put in the kits.

The green paper is the letter which explained the point of the kit and the importance of home practice in increasing reading ability and fluency. I also explained each item in the kit, and if needed, how to use it. The yellow stock is a decoding strategies sheet. Unfortunately I got it from another teacher and I'm not sure where she got it from. However, I found some cute bookmarks here and this page has a couple options as well.
Next is the orange sheet, which is just a list of books good for first graders. I found this list by just doing a quick google search, and a lot of schools have ones that are available to use. Lastly, there is the blue stock, which is a list of activities that can be done to practice sight words/spelling words (click here to download). I actually had a more extensive list, however because many of my students are from households on very fixed and limited budgets, I chose to keep to activities that would require very minimal resources.

I also included various readers. I'm not completely sure how much age-appropriate children's literature my students have access to, so I provided it. Plus, I don't know what it is about paper mini-books, but my kids are obsessed with them. The books on the top left are from the wonderful Cherry Carl. My favorite thing about her mini books are the ease to make them. If I remember to tell the copier to sort, then it takes me about 10 minutes to staple and cut a class set of books. The book in the top right is from Scholastic's Word Family Tales Teaching Guide and the books on the bottom right are from Scholastic's Sight Word Readers Teaching Guide. I tried to include a mix of books based on sight words as well as books focusing on word families.
The last thing I included in my kit was the ring with the sight words on them. I used the cards I had created for my memory game and just tossed the instruction cards (click here to download pre-primer cards and here to download primer cards). I went ahead and made enough copies for each of my students to have both complete sets. At the end of the school year I'll just send anything left over home and cross some fingers that maybe they'll master them over the summer.
It took a little pre-planning to figure out the best way to efficiently manage these rings. First thing I did was cut out (over a thousand cards, with the help of my 16 year old brother), hole punch (with the help of my boyfriend), and "file" each word in an envelope.

Then I created each child's ring. For most of them I added words in consecutive, alphabetical order, such as words "a-jump". Some got more, some got less depending on their current level and needs. But for a couple of my "super special" friends, their rings were completely customized. To keep track of this, every child got a name label on the back of the "a" card, and I jotted down what I sent home on one of my data collection sheets (just a table with their names listed down the side). In my letter I instructed parents to send in their child's ring when more words needed to be added, so the labels keep me from mixing up whose ring is whose and my list let's me know where I left off for each kiddo.

Lastly, I bagged it up, and stuck another name label on the bag and they were ready to head home.
Phew! I know that seems like a lot, but it really wasn't that bad. Thanks to a very faithful parent volunteer, the help of my brother and boyfriend it probably only took me about 12 hours to get it all together (that includes the making of a few hundred additional books which are ready to be sent home when needed). Obviously you don't have to make everything in one fell swoop, however I like knowing that all I have to do is grab an envelope or pull out a stack of books from my crate to add to the kits. All the hard work is done.
Hopefully all this hard work will pay off, even if it's only for a few children. Only time will tell.
In the 1st grade class I am in, this has proved to be a big problem. I have students with special needs and/or learning disabilities, but I also have students who never went to Pre-K or Kindergarden or who attended a Kindergarden that was more like a Pre-K in the state of Maryland. One of my students came from a state where 1st grade was more like our Pre-K, and thus when she came in November, she didn't even know her whole alphabet. Yikes!
One of my (hopefully) solutions was to create home literacy kits. Many studies show that students who receive support/practice at home excel more than those who do not. My hope is that if I provide the resources, then maybe some of my student's parents/guardians will start practicing with them at home.
Here is what I put in the kits.

The green paper is the letter which explained the point of the kit and the importance of home practice in increasing reading ability and fluency. I also explained each item in the kit, and if needed, how to use it. The yellow stock is a decoding strategies sheet. Unfortunately I got it from another teacher and I'm not sure where she got it from. However, I found some cute bookmarks here and this page has a couple options as well.
Next is the orange sheet, which is just a list of books good for first graders. I found this list by just doing a quick google search, and a lot of schools have ones that are available to use. Lastly, there is the blue stock, which is a list of activities that can be done to practice sight words/spelling words (click here to download). I actually had a more extensive list, however because many of my students are from households on very fixed and limited budgets, I chose to keep to activities that would require very minimal resources.

I also included various readers. I'm not completely sure how much age-appropriate children's literature my students have access to, so I provided it. Plus, I don't know what it is about paper mini-books, but my kids are obsessed with them. The books on the top left are from the wonderful Cherry Carl. My favorite thing about her mini books are the ease to make them. If I remember to tell the copier to sort, then it takes me about 10 minutes to staple and cut a class set of books. The book in the top right is from Scholastic's Word Family Tales Teaching Guide and the books on the bottom right are from Scholastic's Sight Word Readers Teaching Guide. I tried to include a mix of books based on sight words as well as books focusing on word families.
The last thing I included in my kit was the ring with the sight words on them. I used the cards I had created for my memory game and just tossed the instruction cards (click here to download pre-primer cards and here to download primer cards). I went ahead and made enough copies for each of my students to have both complete sets. At the end of the school year I'll just send anything left over home and cross some fingers that maybe they'll master them over the summer.
It took a little pre-planning to figure out the best way to efficiently manage these rings. First thing I did was cut out (over a thousand cards, with the help of my 16 year old brother), hole punch (with the help of my boyfriend), and "file" each word in an envelope.

Then I created each child's ring. For most of them I added words in consecutive, alphabetical order, such as words "a-jump". Some got more, some got less depending on their current level and needs. But for a couple of my "super special" friends, their rings were completely customized. To keep track of this, every child got a name label on the back of the "a" card, and I jotted down what I sent home on one of my data collection sheets (just a table with their names listed down the side). In my letter I instructed parents to send in their child's ring when more words needed to be added, so the labels keep me from mixing up whose ring is whose and my list let's me know where I left off for each kiddo.

Lastly, I bagged it up, and stuck another name label on the bag and they were ready to head home.
Phew! I know that seems like a lot, but it really wasn't that bad. Thanks to a very faithful parent volunteer, the help of my brother and boyfriend it probably only took me about 12 hours to get it all together (that includes the making of a few hundred additional books which are ready to be sent home when needed). Obviously you don't have to make everything in one fell swoop, however I like knowing that all I have to do is grab an envelope or pull out a stack of books from my crate to add to the kits. All the hard work is done.
Hopefully all this hard work will pay off, even if it's only for a few children. Only time will tell.
Thursday, April 21, 2011
14 ways to build a classroom library without ever paying full price for a book
How's that for a word-y, yet descriptive title?
I've been collecting books for about 2 years now, despite having only graduated in December. It was advice given to me by a teacher during my junior year of college and I'm glad I took it. Even though I have yet to get my own classroom, I have over 300 titles to add to it whenever that day comes. I plan on doing more shopping this summer, so that number will probably grow before the fall.
Setting up a classroom library is not cheap however, and I think most teachers these days find themselves funding their own libraries (which is why my teacher suggested "start now" to ease the financial pain). There are many ways to do it however, without spending an arm and a leg and getting more books for you buck. Here are some of the ways I've collected books (along with some I haven't used yet, but have known other teachers to have success with).
I've been collecting books for about 2 years now, despite having only graduated in December. It was advice given to me by a teacher during my junior year of college and I'm glad I took it. Even though I have yet to get my own classroom, I have over 300 titles to add to it whenever that day comes. I plan on doing more shopping this summer, so that number will probably grow before the fall.
Setting up a classroom library is not cheap however, and I think most teachers these days find themselves funding their own libraries (which is why my teacher suggested "start now" to ease the financial pain). There are many ways to do it however, without spending an arm and a leg and getting more books for you buck. Here are some of the ways I've collected books (along with some I haven't used yet, but have known other teachers to have success with).
- Ask for donations If you have family and friends with children, ask if they would be willing to donated books they no longer want to your classroom. Unless they are like my mother (who is hoarding all of our childhood books for the grandkids who are still years off), then this is a great way to gather up a bunch of childhood favorites for $0.
- Look into local book banks If you live in a major city (I live in Baltimore), see if they have any sort of book bank. We have one in Baltimore that gives away free books to anyone who shows up at their door. I've found copies of books that have never been read, along with large collections (I have many of the Junie B. Jones books thanks to a girl named Eva who donated her collection) and paid nothing for them. In return however, I have donated my time to help organize and shelve incoming donations. It's a win-win because as I shelve I get to go through all the books and pick out what I want to keep.
- Yard sales If you can't seem to get books for free, this is my #1 way to build up a library on the cheap. I use Craigslist to plot my route, looking for sales advertising children's items. I usually find a few more along the way. Church or neighborhood flea markets are a great way to hit a lot of people at once. Children's books aren't a top yard sale seller, so most people are happy to see them go. It also means that you don't need to be up at the crack of dawn, the closer you get to noon, when most people are getting ready to close up shop, the better deals you can get because people don't want to pack it back up. If you let people know you are a teacher, many are willing to let huge stacks go for under $5. I went out one day last summer with $40 and came back with 125 books, the majority like new.
- Library Sales Some libraries hold sales a few times a year to help clear out any books that have been removed from their shelves. My local library system does not do this, but check and see if yours does.
- Large Scale Used Book Sales If you have the patience to dig through piles of books, this is a good way to hunt through loads of books in once place. Many times these sales will benefit a cause, so it's sort of a two for one deal.
- http://www.betterworldbooks.com/ I have yet to purchase anything from them, however, the prices seem great, you can't beat free shipping, and it's a good way to add specific titles to your library since it's not as hit and miss like yard sales and used books sales might be. This is how my library sells all their unwanted books and you can search by zip code so that your sales benefit locations near you.
- Ebay.com Look for book lots, and start bidding. Watch out for shipping however, and remember to factor that into your costs. Many times I'll spot a good deal, only to see that the shipping costs no longer make it a good deal.
- Goodwill, Salvation Army, etc. I haven't done too much book hunting at these locations, but I have seen books there, and just like at yardsales, they aren't something that moves fast. Only difference is you can't negotiate price.
- Overstock.com I just looked and there currently are over 9,000 children's books for under $5, many which are popular titles. Shipping is always $2.95 (sometimes less), so you'll never spend an arm and a leg on shipping there.
- Daedalusbooks.com Good deals on some popular books titles. Shipping is more than Overstocks, but still not enough to not make it a good deal. *** Note that the site contains adult media, so I would not recommend allowing children to browse it freely.***
- Used book stores I tend to find that this is too pricey of a way to add a large volume of books, but it's still a good option to consider.
- Scholastic Warehouse Sales I attended one last May and I would say it's worth the trip to add new and popular titles to your library. You can also sign up to volunteer (I bagged books at checkout) and you get reimbursed $10 of books an hour. I got $170 worth of books for $70, but had a $50 voucher from my volunteer hours, so I only paid $30. Can't beat that for over 30 brand new books. And it was a lot of fun to chat with both the fellow teacher volunteers, the teachers coming through checkout, as well as the many homeschool parents who showed up.
- Discount Chain Stores Places like Marshalls, T.J.Maxx, and Ross will sometimes carry children's books. Next time your out shopping, check in the children's section and see what they have.
- Amazon.com My family buys a ton from Amazon, and you can sometimes find good deals on popular (and not so popular) titles. You'll probably want to avoid buying a lot from private vendors, as shipping will add up quick, and ignore the penny books, as you'll still get charged $7+ for shipping on each book. We have an Amazon Prime membership, so I usually just stick to books that will ship for free that way.
There are a few things that I have learned to keep in mind while shopping for books:
- Avoid buying really popular titles/series from anywhere but yard sales (think Magic Treehouse, Junie B. Jones, Bernstein Bears, etc.), as they are really easy to find there, and much cheaper than say buying at a used book store or on Amazon.com, etc.
- No matter how good of a deal, avoid wasting your money on titles/series that may be outdated. You can find a healthy serving of Lizzie McGuire and Mary Kate and Ashley books at yard sales, however, most of your students will have never seen those shows and they won't have the same appeal they did even 5 years ago.
- On the contrary, snag books that will be relevant to your kids today, if the price is right. I found a bunch of High School Musical and Hannah Montana books one time for a $1 each. I was working in a 3rd grade classroom one time and they couldn't wait to get their hands on them, even the reluctant readers.
- Check copyright dates in nonfiction books. It's usually fairly obvious by the photos they contain how old they are, and for certain topics, the information is good forever, but for many topics, it's changing quickly, and a book that is 10 years old will contain a lot of outdated information.
How are you building your library? What's the best deal you've ever found?
Sunday, April 17, 2011
I'm now a teacher... sort of!
So after a 10 month hiatus, I'm pleased to announce that I'm back, and now a teacher! But, it's only sort of...
Thanks to this awesome job market and the fact that I'm a December graduate, I knew for a fact that I would not find a full time job. So my best shot was a long-term substitute position. And who knew even those were so competitive. Who knew the teaching market was so competitive in general.
After almost half a dozen interviews, all which turned up nothing, I sort of came to the conclusion that maybe I'm not so great of an interviewer. Not to brag, but I know I'm an awesome teacher. I got some of the highest "marks" that my supervisor had ever seen during my year of student teaching. However I seem to have issues conveying that, I guess.
Anyways, just as I was about to start looking into other non-teaching options, I got a call on a Thursday afternoon from an assistant principal who needed a sub for a 1st/2nd grade special education teacher. The kicker, she needed to me to start the next day. Needless to say, I mumbled something that came out "okay, I'll be there" in my state of shock and showed up the next morning. Originally, it was only for that Friday and the next week, however they suspected that it would be longer, so they wanted to get a certified teacher in as soon as they could. Sure enough, I've now been there over a month, and although supposedly my time will end at the beginning of May, everyone is fairly certain I will be there till the end of the year.
I've learned a ton during my time there, especially considering I'm only a general elementary teacher and not a special educator. The other (amazing and awesome) special education teachers have generously given me many mini crash courses in special eduction 101. I love the teachers I work with (and those that I don't), although I'll just be nice and just say the administration is less than stellar. Which is a bummer since I'm told about half of the staff have requested transfers and I know there is a strong chance that I'd be a first pick to fill one of those vacancies.
All my new little friends are awesome and I've quickly fallen in love with them, which will make it hard if I have to up and leave them in just a couple weeks. They've also really challenged me, and caused me to lose lots of sleep at night. Where some of them are academically (and emotionally and socially for a couple) is down right frightening and I worry so much about their future. It's also given me a sense of urgency and I am doing all I can right now to hopefully better them for their inevitable futures.
So I'm back now and I've got loads of stuff to share and thought it was due time that I get back to blogging here. Especially now that I'm a teacher... sort of.
Thanks to this awesome job market and the fact that I'm a December graduate, I knew for a fact that I would not find a full time job. So my best shot was a long-term substitute position. And who knew even those were so competitive. Who knew the teaching market was so competitive in general.
After almost half a dozen interviews, all which turned up nothing, I sort of came to the conclusion that maybe I'm not so great of an interviewer. Not to brag, but I know I'm an awesome teacher. I got some of the highest "marks" that my supervisor had ever seen during my year of student teaching. However I seem to have issues conveying that, I guess.
Anyways, just as I was about to start looking into other non-teaching options, I got a call on a Thursday afternoon from an assistant principal who needed a sub for a 1st/2nd grade special education teacher. The kicker, she needed to me to start the next day. Needless to say, I mumbled something that came out "okay, I'll be there" in my state of shock and showed up the next morning. Originally, it was only for that Friday and the next week, however they suspected that it would be longer, so they wanted to get a certified teacher in as soon as they could. Sure enough, I've now been there over a month, and although supposedly my time will end at the beginning of May, everyone is fairly certain I will be there till the end of the year.
I've learned a ton during my time there, especially considering I'm only a general elementary teacher and not a special educator. The other (amazing and awesome) special education teachers have generously given me many mini crash courses in special eduction 101. I love the teachers I work with (and those that I don't), although I'll just be nice and just say the administration is less than stellar. Which is a bummer since I'm told about half of the staff have requested transfers and I know there is a strong chance that I'd be a first pick to fill one of those vacancies.
All my new little friends are awesome and I've quickly fallen in love with them, which will make it hard if I have to up and leave them in just a couple weeks. They've also really challenged me, and caused me to lose lots of sleep at night. Where some of them are academically (and emotionally and socially for a couple) is down right frightening and I worry so much about their future. It's also given me a sense of urgency and I am doing all I can right now to hopefully better them for their inevitable futures.
So I'm back now and I've got loads of stuff to share and thought it was due time that I get back to blogging here. Especially now that I'm a teacher... sort of.
Wednesday, June 30, 2010
Kill the Math Drill
We've all done them, we've all probably given them, and I'm pretty sure we could all say that we hated them, and they never really worked. You know, those dreaded math drills, where you did flash cards, and sheets and sheets of fact problems. Can anyone say booorrrring!
I can't say I was all that surprised when my boyfriend's sister emailed me asking for suggestions on more fun ways to do math drills since her daughter gets that glazed over look after about a minute or two. Hm, sounds like someone else I know.... just ask my mother.
Truth is, math drills are not fun, and research has shown time and time again that they don't work. I can definitely say I'm living proof of that, and I'm sure a lot of you could say the same thing. So from now on, let's plan on killing the math drill and replacing it with something a lot more fun.
But replace it with what you ask? Well, games of course! What kid (or adult) doesn't like games? I certainly have yet to meet one. So plan on tossing those fact sheets in the recycling bin, but do hold onto those flash cards, because you will need them, but not for drilling!
To play most of these games, you'll need to following items. These all are good items to have around for any math skill, so if you do not already own them, I strongly recommend adding them to your resources.
Clear the Board
This is by far my favorite game to practice facts. One, because it's really easy to disguise the fact practice with this game, and two because it requires both players to constantly be thinking, because you want to make sure your partner isn't cheating and adding/subtracting/multiplying/dividing correctly. And in all honesty, this game is addicting, my fellow college classmates and I did not want to stop playing.
To play this game you'll need a game board (download here), game instructions (download here), 24 counters, and two number generators.
Follow the Leader
Grab a set of dominoes and the sorting board (download here). Lay all the dominoes face down on the table and then choose one to be the leader and place in the leader position on the board. Find the total number of pips (technical name for the little white dots) on the leader. (Note: Don't have the students write down the total, if they forget it, then it just means that's one more opportunity to practice a fact). Then flip over the remaining dominoes one at a time and sort according to their total in relationship to the leader.
Graphing
Kids love to graph and graphing totals is a great way to reinforce facts while doing a little work with data collecting and probability. There are many ways you can do it. You can use dominoes, a pair of number generators, and even flash cards if you want to. Have students add up the total, and record it on the graph (download here). Make the graphs reusable by using linking/Unifix cubes to record, or laminate or slip into a sheet protector and use white board markers. Be sure to discuss results when your finished!
Here and There
You can make the basic clear the board game more advanced by pulling out flash cards whose answer equals one through six and using those instead of a number generator. (Click here to download game board template and instructions).

Domino Train
Make a train with a set of numbers by requiring the next domino's total/difference to either be one less or one more than the one before. (You'll want to have at least 3 or 4 sets to get a really good train going).
Addition/Subtraction Bingo
Just like a regular game of bingo, only instead of calling out N56, you'll be adding or subtracting with flash cards. You'll need a set of flash cards, game board (download pre-made boards here, or blank boards here), and a bunch of manipulatives to mark those spots.
I Have/Who Has
This is a really fun game to play when you have 5-10 minutes to kill, but only after you've taught it and practiced it a few times. To play, distribute the deck of cards out to all the players (it's okay if some people have two). Choose a player to start and have them read their card (both the "I have" and the "Who has" parts), then the person with the "who has" answer, reads their card and so on and so forth until it makes it back to the person who started.
For example: "I have 6. Who has 2+3?" "I have 5. Who has 5+6?" I have 11. Who has 9+1?" .... "I have 2. Who has 3+3."
You can make your own game cards using index cards (I suggest writing out all the cards on paper first to check your accuracy). There are also some additional play ideas and some downloadable cards here. I've also seen card sets available for purchase at various teacher stores.
Fact Family Triangles
Fact Family triangles were something new to me this year, but I really liked how they allowed students to see the relationships between sets of numbers. One of my first graders favorite things to do was to quiz each other with these triangles. Our sets came out the curriculum (Everyday Mathematics), but you can easily create your own. The total is always at the top of the triangle and noted by a dot. Two numbers that make up the total are in the other two corners.
When quizzing each other, one student holds up a triangle, covering one corner of the triangle. The student then must find the covered up number by using the other two numbers to solve. If you want to practice addition, have students always cover the top number (the one with the dot), and for subtraction, choose one of the bottom numbers. Or if they need work with both, tell students to keep each other on their toes and switch it up.
Students always love a race, so I suggest pairing up students, giving each pair a set of triangles and setting a timer. Let each students have a turn quizzing the other, and then see who collected more right answers. Kids also love playing with the teacher, and I am always sure to truly play, even if that means I beat the student. Then I usually tell them it's because I've practiced my facts, and boy does that motivate them to keep practicing! They love it when they can eventually beat the teacher because they've practiced enough.

Near Doubles Hunt
This isn't really a game as much as it as mnemonic device of sorts to help students solve facts quickly. Students usually are taught their doubles facts early on and tend to remember them better than the rest. By having them note facts that are near doubles, they can use that knowledge to help them solve more facts.
Have students take a set of flash cards or dominoes and pull out all the doubles. Then have them hunt for the near doubles to match them with (You'll want to have at least 3 or 4 sets on hand for this.)
War
I'm sure you have played the card game of war at least once in your life. Throw a little twist in by using flash cards with the largest sum/difference, etc. being the winning card. To play split the deck between two players. Then both the players draw their top cards, find the sum/difference, etc. and then determine who's is larger. The person with the larger number gets to keep both cards. If both cards equal the same amount, set those two cards aside and then each player lays 3 cards face down in from of them and then flips over a fourth. The winning card gets all 10 cards. Play continues until someone get's all the cards in the deck or time is up and the person with most cards wins.
Online Games
There are tons of online math games that your kids can play. Try the Math Arcade at Funbrain and Math Learning Games for Kids to get you started. If you have other recommendations, let me know!
And there you have it! Plenty of ideas to keep boring math drills at bay. If you have any more ideas, feel free to leave a comment or write a blog post and I'll add your link to the list!
I can't say I was all that surprised when my boyfriend's sister emailed me asking for suggestions on more fun ways to do math drills since her daughter gets that glazed over look after about a minute or two. Hm, sounds like someone else I know.... just ask my mother.
Truth is, math drills are not fun, and research has shown time and time again that they don't work. I can definitely say I'm living proof of that, and I'm sure a lot of you could say the same thing. So from now on, let's plan on killing the math drill and replacing it with something a lot more fun.
But replace it with what you ask? Well, games of course! What kid (or adult) doesn't like games? I certainly have yet to meet one. So plan on tossing those fact sheets in the recycling bin, but do hold onto those flash cards, because you will need them, but not for drilling!
To play most of these games, you'll need to following items. These all are good items to have around for any math skill, so if you do not already own them, I strongly recommend adding them to your resources.
- Flash cards of all sorts (addition,subtraction,multiplication, and division) If you don't own any, you can easily make some with index cards. This time of year you can also find some at places like the Dollar Store and the Target Dollar Spot. (Don't go to a teacher store for these! You'll pay way to much.)
- Manipulatives/Counters If you have a student new to addition/subtraction, etc. keep some manipulatives handy to they can work the problem and check their work until they are more comfortable with the facts. You'll also need some for some of the games. You don't necessarily need the expensive store bought manipulatives either, dry beans, flat glass marbles, and poker/bingo chips all work great and can be found at the dollar store or even in your own home. Pennies also work great if you have a lot lying around. You can even make some with paint chips.
- Dominos Always good to have a set on hand.
- Dice/Number Generators
__________________________________________________________________________________
Clear the Board
This is by far my favorite game to practice facts. One, because it's really easy to disguise the fact practice with this game, and two because it requires both players to constantly be thinking, because you want to make sure your partner isn't cheating and adding/subtracting/multiplying/dividing correctly. And in all honesty, this game is addicting, my fellow college classmates and I did not want to stop playing.
To play this game you'll need a game board (download here), game instructions (download here), 24 counters, and two number generators.
Follow the Leader
Grab a set of dominoes and the sorting board (download here). Lay all the dominoes face down on the table and then choose one to be the leader and place in the leader position on the board. Find the total number of pips (technical name for the little white dots) on the leader. (Note: Don't have the students write down the total, if they forget it, then it just means that's one more opportunity to practice a fact). Then flip over the remaining dominoes one at a time and sort according to their total in relationship to the leader.
Graphing
Kids love to graph and graphing totals is a great way to reinforce facts while doing a little work with data collecting and probability. There are many ways you can do it. You can use dominoes, a pair of number generators, and even flash cards if you want to. Have students add up the total, and record it on the graph (download here). Make the graphs reusable by using linking/Unifix cubes to record, or laminate or slip into a sheet protector and use white board markers. Be sure to discuss results when your finished!
Here and There
You can make the basic clear the board game more advanced by pulling out flash cards whose answer equals one through six and using those instead of a number generator. (Click here to download game board template and instructions).

Domino Train
Make a train with a set of numbers by requiring the next domino's total/difference to either be one less or one more than the one before. (You'll want to have at least 3 or 4 sets to get a really good train going).
 |
| Total of my first is 6, one less is 5, one more is 6, one more is 7, then I made a mistake and did 2 less is 5, and then another mistake with 5 again (I lost my brain apparently), one less is 4, and one less is 3. You get the point I hope. |
Just like a regular game of bingo, only instead of calling out N56, you'll be adding or subtracting with flash cards. You'll need a set of flash cards, game board (download pre-made boards here, or blank boards here), and a bunch of manipulatives to mark those spots.
I Have/Who Has
This is a really fun game to play when you have 5-10 minutes to kill, but only after you've taught it and practiced it a few times. To play, distribute the deck of cards out to all the players (it's okay if some people have two). Choose a player to start and have them read their card (both the "I have" and the "Who has" parts), then the person with the "who has" answer, reads their card and so on and so forth until it makes it back to the person who started.
For example: "I have 6. Who has 2+3?" "I have 5. Who has 5+6?" I have 11. Who has 9+1?" .... "I have 2. Who has 3+3."
You can make your own game cards using index cards (I suggest writing out all the cards on paper first to check your accuracy). There are also some additional play ideas and some downloadable cards here. I've also seen card sets available for purchase at various teacher stores.
Fact Family Triangles
Fact Family triangles were something new to me this year, but I really liked how they allowed students to see the relationships between sets of numbers. One of my first graders favorite things to do was to quiz each other with these triangles. Our sets came out the curriculum (Everyday Mathematics), but you can easily create your own. The total is always at the top of the triangle and noted by a dot. Two numbers that make up the total are in the other two corners.
When quizzing each other, one student holds up a triangle, covering one corner of the triangle. The student then must find the covered up number by using the other two numbers to solve. If you want to practice addition, have students always cover the top number (the one with the dot), and for subtraction, choose one of the bottom numbers. Or if they need work with both, tell students to keep each other on their toes and switch it up.
Students always love a race, so I suggest pairing up students, giving each pair a set of triangles and setting a timer. Let each students have a turn quizzing the other, and then see who collected more right answers. Kids also love playing with the teacher, and I am always sure to truly play, even if that means I beat the student. Then I usually tell them it's because I've practiced my facts, and boy does that motivate them to keep practicing! They love it when they can eventually beat the teacher because they've practiced enough.

 |
| Top is covered, so you must add the two numbers. 6+4=10 which is the hidden number. |
 |
| Top number is shown, so must subtract bottom number from top number. 10-4=6 which is the hidden number. |
Near Doubles Hunt
This isn't really a game as much as it as mnemonic device of sorts to help students solve facts quickly. Students usually are taught their doubles facts early on and tend to remember them better than the rest. By having them note facts that are near doubles, they can use that knowledge to help them solve more facts.
Have students take a set of flash cards or dominoes and pull out all the doubles. Then have them hunt for the near doubles to match them with (You'll want to have at least 3 or 4 sets on hand for this.)
 |
| Near doubles for 5+5 with dominoes. |
I'm sure you have played the card game of war at least once in your life. Throw a little twist in by using flash cards with the largest sum/difference, etc. being the winning card. To play split the deck between two players. Then both the players draw their top cards, find the sum/difference, etc. and then determine who's is larger. The person with the larger number gets to keep both cards. If both cards equal the same amount, set those two cards aside and then each player lays 3 cards face down in from of them and then flips over a fourth. The winning card gets all 10 cards. Play continues until someone get's all the cards in the deck or time is up and the person with most cards wins.
 |
| I found this card set at the Dollar Store I believe. It's by School Zone. |
There are tons of online math games that your kids can play. Try the Math Arcade at Funbrain and Math Learning Games for Kids to get you started. If you have other recommendations, let me know!
__________________________________________________________________________________
And there you have it! Plenty of ideas to keep boring math drills at bay. If you have any more ideas, feel free to leave a comment or write a blog post and I'll add your link to the list!
Monday, June 14, 2010
Library Thing
I've stumbled upon this really cool site called Library Thing. I wish I could credit someone for my discovery, however, I cannot recall where I found the link to it. I found it somewhere while searching for various ways to organize my classroom library. Although I don't actually have a classroom to place my 300+ books in just yet, I wanted to organize it in some way so I could see which areas I was lacking books (I'm on a book buying kick, and I'm trying to at least be semi-smart with my purchases.)
I had thought about making an Excel spread sheet for all my books, but the idea of entering alllllllll that information in manually completely freaked me out. In walks Library Thing.
Library Thing is free for up to 200 books, or $10 a year, or $25 for a lifetime membership after that. It's so easy to use, and it took me, at the most, 3 hours to enter in all 300+ books. All you do is type in the books title, and it pulls up a variety of choices for you to choose from. When you find the one you want, you just click it, and viola!, it's been added to your library. You can also add tags to note various things about the book; I noted when I had more than one copy, for example. I also took the time to go in and change the covers to match the one I actually had. Some of the copies I own of very popular books (think Beverly Cleary) are old, so I had to change the cover back to one from the '90's or even the '80's in some cases. This makes it a lot easier to search and then go find the books, since I know I tend to skim for a cover that looks like what I saw.
The one thing I really, really love about Library Thing is that it's so searchable without me having to go through and make it that way. It adds all the info I could need for most all books (some books just aren't popular enough), including the author, illustrator, major themes and topics, and a lot more, which I can then search.
It can also be shared, and others can see what is in your library. Stop by and take a look and my library and share the link to yours!
Do you store any information on your books electronically? If so, how do you do it?
I had thought about making an Excel spread sheet for all my books, but the idea of entering alllllllll that information in manually completely freaked me out. In walks Library Thing.
 |
| My library has grown a lot since it's humble beginnings a year ago. Back in the day, it all fit in a large tub, with various other items. |
Library Thing is free for up to 200 books, or $10 a year, or $25 for a lifetime membership after that. It's so easy to use, and it took me, at the most, 3 hours to enter in all 300+ books. All you do is type in the books title, and it pulls up a variety of choices for you to choose from. When you find the one you want, you just click it, and viola!, it's been added to your library. You can also add tags to note various things about the book; I noted when I had more than one copy, for example. I also took the time to go in and change the covers to match the one I actually had. Some of the copies I own of very popular books (think Beverly Cleary) are old, so I had to change the cover back to one from the '90's or even the '80's in some cases. This makes it a lot easier to search and then go find the books, since I know I tend to skim for a cover that looks like what I saw.
The one thing I really, really love about Library Thing is that it's so searchable without me having to go through and make it that way. It adds all the info I could need for most all books (some books just aren't popular enough), including the author, illustrator, major themes and topics, and a lot more, which I can then search.
It can also be shared, and others can see what is in your library. Stop by and take a look and my library and share the link to yours!
Do you store any information on your books electronically? If so, how do you do it?
Thursday, June 3, 2010
The Creative and Organized Teacher
I've recently been on the lookout for great books to add to my resource library. Best way to do it, I've found is by checking things out from the library to "try before you buy."
Recently I've come across two books (part of the same series from the same authors) that I though where just amazing, and two that I think any teacher, but especially a new teacher (or possibly a teacher making a grade change), would want to keep around.
 The first one is The Creative Teacher. This book is full of great ideas and a wealth of ready to go projects and reproducibles. This is the kind of book that would be especially great to have around this time of the year when you've burned through all your curriculum and still have a couple weeks to go. There are also a lot of projects that are very self contained and would be great for emergency substitute plans. The homeschooler would also have a lot of fun with this book, especially if your a homeschooler who prefers to make your own curriculum.
 The Organized Teacher is also a great book, and is more of a teacher reference, with things like checklists, assessments, and other basic info. The veteran teacher may not find to much in this book that they already don't have, but a new teacher, like myself, would love this book. Probably the most helpful thing in there is all the checklists for things like the beginning of the year, back to school night, field trips, evaluations, parent conferences, etc. I can see them being a huge time saver, especially if your school doesn't provide you with some sort of checklist itself. The homeschooler probably wouldn't find this book as useful or worth buying, however, it would be worth it to see if your library had it, to see if there is anything that would be useful to you.
Although I just made copies galore out of these two books, I certainly wouldn't mind adding them to my resource library. If you know someone who is graduating and about to have a classroom of their own, both of these books would make wonderful gifts.
Do you have a favorite resource book you think I should check out? Let me know! I'd love your suggestions.
* Disclaimer: I was not paid to review either of these books. If you click on the links, and buy the books through those links, I will make a small commission through Amazon.com's affiliate program. I will be grateful if you choose to purchase that way.
Recently I've come across two books (part of the same series from the same authors) that I though where just amazing, and two that I think any teacher, but especially a new teacher (or possibly a teacher making a grade change), would want to keep around.
The first one is The Creative Teacher. This book is full of great ideas and a wealth of ready to go projects and reproducibles. This is the kind of book that would be especially great to have around this time of the year when you've burned through all your curriculum and still have a couple weeks to go. There are also a lot of projects that are very self contained and would be great for emergency substitute plans. The homeschooler would also have a lot of fun with this book, especially if your a homeschooler who prefers to make your own curriculum.Although I just made copies galore out of these two books, I certainly wouldn't mind adding them to my resource library. If you know someone who is graduating and about to have a classroom of their own, both of these books would make wonderful gifts.
Do you have a favorite resource book you think I should check out? Let me know! I'd love your suggestions.
* Disclaimer: I was not paid to review either of these books. If you click on the links, and buy the books through those links, I will make a small commission through Amazon.com's affiliate program. I will be grateful if you choose to purchase that way.
Subscribe to:
Posts (Atom)